使用缓存
好处:
1、加快响应速度;
2、减轻数据库压力;
3、提升服务负载能力;
缺点:
1、数据冗余存储、空间;
2、代码开发;
3、缓存服务稳定性维护;
4、存在数据一致性误差;
5、过分依赖缓存,一旦缓存失效或出现问题,数据库会出现无法预知的压力,不方便预警及实时问题修复;
Spring缓存
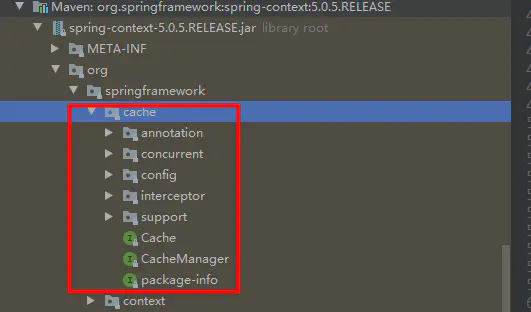
image.png
Cache
说明
缓存接口,定义缓存操作。实现有:RedisCache、EhCacheCache、ConcurrentMapCache等;
具体意义
每一个cache中存储一个缓存信息,比如说:用户信息缓存(user_cache)、商品信息缓存(product_cache)...然后每一个cache中又会用具体的缓存key做具体区分,如:用户信息缓存中,根据用户id区分,那么用户id就是user_cache中的key;product_cache中又以商品id作为key区分具体缓存记录;
public interface Cache {
...
public abstract class AbstractCacheManager implements CacheManager, InitializingBean {
...
CacheManager
1、缓存管理器,管理各个缓存(Cache)组件,针对不同的业务场景,可以定义多个不同的CacheManager管理具体cache数据;
2、比如说:我们可以通过CacheManager加载各个cache,并且可以初始化各个cache的参数设置,如过期时间等;
3、我们缓存数据需要指定cache manager跟具体被其管理的cache,这样才可以正确缓存;
public interface CacheManager {
...
public abstract class AbstractTransactionSupportingCacheManager extends AbstractCacheManager {
...
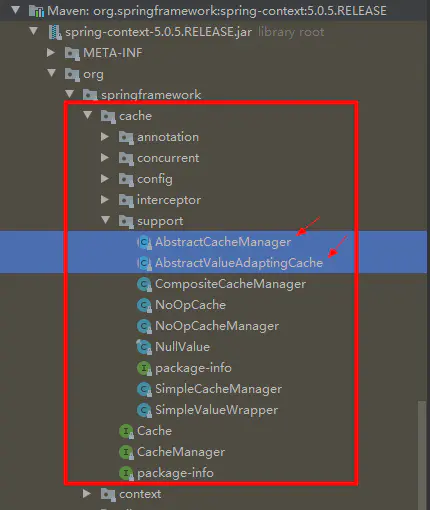
image.png
@EnableCaching
开启基于注解的缓存,属于spring4.x之后的spring 缓存注解;
@CacheConfig
在类上使用@CacheConfig统一的配置缓存的信息,包括指定cacheManager、具体cache等;
@Cacheable
主要针对方法配置,能够根据方法的请求参数对其结果进行缓存,具体缓存的key可以指定;
@CachePut
保证方法调用,又能将结果缓存,可以用于刷新缓存,同样key需要指定,需要跟@Cacheable中制定的key对应保持一致,同样是将方法返回结果进行保存,所以同样需要跟@Cacheable方法中的结果返回类型一致;
@CacheEvict
针对指定的key,清空缓存;
具体代码演示
SpringBoot及Spring默认缓存——本地缓存
默认使用的是SimpleCacheConfiguration

image.png
pom依赖

image.png

image.png
所以:只要依赖了spring-boot-starter-web就可以使用spring默认缓存
关于配置
可以使用SpringBoot提供的默认配置,所以在使用spring默认缓存时,可以不需要要在yml文件中配置任何cache相关的信息;
但是一旦依赖了其它实现的缓存jar包如redis、ehcache,要想再使用默认,则需要指定配置。如下:
自定义cache、cache类型指定
spring:
  cache:
    cache-names:
      - localDefaultCache
      - concurrentCache
    type: simple
SpringBoot启动类
开启缓存@EnableCaching
@SpringBootApplication
@MapperScan("com.fc.redis.mapper")
@EnableCaching // 开启spring缓存
public class RedisApplication {
    /**
     * @author GY
     * @date 2019年9月13日
     */
    public static void main(String[] args) {
        SpringApplication.run(RedisApplication.class, args);
    }
}
缓存service类
/**
 * @program: fc-redis->ConcurrentCacheTestService
 * @description: 测试默认缓存manager——concurrentCache
 * @author: G_Y
 * @create: 2019-09-10 14:25
 **/
@Service
@CacheConfig(cacheManager = "cacheManager", cacheNames = {"localDefaultCache"})
@Slf4j
public class ConcurrentCacheTestService {
    @Autowired
    private TbUserMapper userMapper;
    @Cacheable(key = "#id") //设置缓存——方法结果
    public TbUser getUser(Integer id) {
        log.info("This is use ConcurrentCache cache user");
        TbUser tbUser = userMapper.selectByPrimaryKey(id);
        return tbUser;
    }
    @CachePut(key = "#user.id") // 更新缓存
    public TbUser addOrUpdateUserById(TbUser user) {
        user.setUpdateTime(new Date());
        if (user.getId() == null || user.getId() == 0) {
            userMapper.insertSelective(user);
            return user;
        }
        userMapper.updateByPrimaryKeySelective(user);
        return user;
    }
    // allEntries:
    //是否清空所有缓存内容,缺省为 false,如果指定为 true,则方法调用后将立即清空所有缓存
    //beforeInvocation:
    //是否在方法执行前就清空,缺省为 false,如果指定为 true,则在方法还没有执行的时候就清空缓存,缺省情况下,如果方法执行抛出异常,则不会清空缓存
    @CacheEvict(key = "#id") //清除缓存
    public boolean deleteUserById(Integer id) {
        int i = userMapper.deleteByPrimaryKey(id);
        if (i > 0)
            return true;
        return false;
    }
}
controller测试
因为是本地缓存,服务停止则缓存移除,所以需要长启动服务,无法使用Junit测试
@RestController
public class CacheTestController {
    @Autowired
    private ConcurrentCacheTestService concurrentCacheTestService;
    /**
     * 测试springboot默认缓存concurrentCache
     *
     * @param
     * @return
     */
    @PostMapping("/test/concurrent/cache/save")
    public TbUser saveUser() {
        TbUser tbUser = new TbUser();
        tbUser.setName("oooo");
        tbUser.setPhone("199");
        tbUser.setUpdateTime(new Date());
        tbUser.setCreateTime(new Date());
        tbUser.setUserName("userName_oooo");
        TbUser user = concurrentCacheTestService.addOrUpdateUserById(tbUser);
        System.out.println(user);
        return user;
    }
    @GetMapping("/test/concurrent/cache/get/{id}")
    public TbUser getUserByIdPro(@PathVariable("id") Integer id) {
        ConcurrentMapCacheManager c;
        TbUser user = concurrentCacheTestService.getUser(id);
        System.out.println(user);
        return user;
    }
}
测试结果:缓存成功
断点跟进查看CacheManager
image.png
首次访问
image.png
数据库sql日志
image.png
再次访问,则不会进入方法逻辑,直接返回缓存数据;(实现原理——动态代理(AOP),所以我猜测如果私有方法上加上注解、或非直接调用的缓存方法,会缓存失效!)
第二次查询未访问数据库,如图:
image.png
证明缓存失效猜想
image.png
访问两次的结果日志
image.png
就算是public修饰,方法内部调用同样失效——这跟cglib动态代理实现的原理有关,方法内部的调用,依然是原方法(super的方法逻辑),因为getUser不会存在具体的代理方法,因为他未被增强!
image.png
image.png
两次访问的结果
image.png
由此证明:猜想完全正确
关于SimpleCache——SpringBoot默认缓存选择
spring3.1之后引进了cache,我们可以使用CacheManager、Cache以及相关缓存注解将缓存集成到系统中,但spring并没有提供配置缓存超时的机制,所以,ConcurrentMapCacheManager无法直接使用超时设置,如有需要,则需要自行主动封装;
SpringBoot整合EhCache缓存使用
优势:
1、可持久化;——意味着可以从磁盘恢复缓存数据(可能会存在数据非同步,针对具体业务场景使用)
2、可以设置key超时过期;
缺陷
1、分布式部署,缓存不一致问题;
具体代码实现
pom依赖
        <dependency>
            <groupId>net.sf.ehcache</groupId>
            <artifactId>ehcache</artifactId>
            <version>2.10.4</version>
        </dependency>
ehcache Java配置代码
@Configuration
@EnableCaching
public class CacheConfig {
    // 如果想要缓存持久化跟缓存启动从磁盘恢复到内存,需要添加如下两个初始化跟终结方法;
    @PostConstruct
    private void init() {
        // 关闭tomcat时增加删除回调的钩子
        System.setProperty(net.sf.ehcache.CacheManager.ENABLE_SHUTDOWN_HOOK_PROPERTY, "true");
    }
    @PreDestroy
    private void destroy() {
        // 关闭tomcat时,执行相应的关闭
        CacheManager.getInstance().shutdown();
    }
    // 自定义EhCacheManager到IOC容器
    @Bean(value = "ehCacheCacheManager")
    public EhCacheCacheManager ehCacheCacheManager() {
        EhCacheCacheManager ehCacheCacheManager = new EhCacheCacheManager();
        ehCacheCacheManager.setTransactionAware(true);
        ehCacheCacheManager.afterPropertiesSet();
        return ehCacheCacheManager;
    }
}
EhCache的具体Cache配置文件
指定配置文件地址
spring:
  cache:
    ehcache:
      config: classpath:/ehcache.xml
配置文件内容
<?xml version="1.0" encoding="UTF-8"?>
<ehcache name="myEncache">
<!--<cacheManagerPeerProviderFactory
class="net.sf.ehcache.distribution.RMICacheManagerPeerProviderFactory"
properties="peerDiscovery=manual"/>-->
<!--
diskStore:为缓存路径,ehcache分为内存和磁盘 2级,此属性定义磁盘的缓存位置
user.home - 用户主目录
user.dir - 用户当前工作目录
java.io.tmpdir - 默认临时文件路径
-->
<diskStore path="D:/cc/ehcachetest/Tmp_Ehcache"/>
<!--
name:缓存名称。
maxElementsInMemory:缓存最大数目
maxElementsOnDisk:硬盘最大缓存个数。
eternal:对象是否永久有效,一但设置了,timeout将不起作用。
overflowToDisk:是否保存到磁盘,当系统宕机时
timeToIdleSeconds:设置对象在失效前的允许闲置时间(单位:秒)。仅当eternal=false对象不是永久有效时使用,可选属性,默认值是0,也就是可闲置时间无穷大。
timeToLiveSeconds:设置对象在失效前允许存活时间(单位:秒)。最大时间介于创建时间和失效时间之间。仅当eternal=false对象不是永久有效时使用,默认是0.,也就是对象存活时间无穷大。
diskPersistent:是否缓存虚拟机重启期数据 Whether the disk store persists between restarts of the Virtual Machine. The default value is false.
diskSpoolBufferSizeMB:这个参数设置DiskStore(磁盘缓存)的缓存区大小。默认是30MB。每个Cache都应该有自己的一个缓冲区。
diskExpiryThreadIntervalSeconds:磁盘失效线程运行时间间隔,默认是120秒。
memoryStoreEvictionPolicy:当达到maxElementsInMemory限制时,Ehcache将会根据指定的策略去清理内存。默认策略是LRU(最近最少使用)。你可以设置为FIFO(先进先出)或是LFU(较少使用)。
clearOnFlush:内存数量最大时是否清除。
memoryStoreEvictionPolicy:可选策略有:LRU(最近最少使用,默认策略)、FIFO(先进先出)、LFU(最少访问次数)。
FIFO,first in first out,这个是大家最熟的,先进先出。
LFU, Less Frequently Used,就是上面例子中使用的策略,直白一点就是讲一直以来最少被使用的。如上面所讲,缓存的元素有一个hit属性,hit值最小的将会被清出缓存。
LRU,Least Recently Used,最近最少使用的,缓存的元素有一个时间戳,当缓存容量满了,而又需要腾出地方来缓存新的元素的时候,那么现有缓存元素中时间戳离当前时间最远的元素将被清出缓存。
-->
<defaultCache
eternal="false"
maxElementsInMemory="100"
overflowToDisk="true"
diskPersistent="false"
timeToIdleSeconds="400"
timeToLiveSeconds="500"
memoryStoreEvictionPolicy="LRU"
/>
<!--
1.TTI timeToIdleSeconds is the maximum number of seconds that an element can exist in the cache without being accessed:
TTI用于设置对象在cache中的最大闲置时间,就是 在一直不访问这个对象的前提下,这个对象可以在cache中的存活时间。
2.TTL timeToLiveSeconds is the maximum number of seconds that an element can exist in the cache whether
or not is has been accessed.
TTL用于设置对象在cache中的最大存活时间,就是 无论对象访问或是不访问(闲置),这个对象在cache中的存活时间。
3.If the eternal flag is set, elements are allowed to exist in the cache eternally and none are evicted。
当配置了 eternal ,那么TTI和TTL这两个配置将被覆盖,对象会永恒存在cache中,永远不会过期。
-->
<!--clearOnFlush = "false"-->
<cache
name="ehcache_test"
eternal="true"
maxElementsInMemory="1"
overflowToDisk="true"
diskSpoolBufferSizeMB="10"
maxElementsOnDisk="0"
clearOnFlush = "false"
diskPersistent="true"
memoryStoreEvictionPolicy="LRU"
>
<!--<cacheEventListenerFactory
class="net.sf.ehcache.distribution.RMICacheReplicatorFactory" />
<!– 比一般配置多了这个 –>
<bootstrapCacheLoaderFactory class="net.sf.ehcache.distribution.RMIBootstrapCacheLoaderFactory"/>-->
</cache>
<!-- 例子1:结果:5秒间隔内不过期,超过10秒一定过期,就不测试了,占用篇幅!备注:缓存的过期是访问后才过期!-->
<cache name="e1_cache"
maxElementsInMemory="1000"
eternal="false"
overflowToDisk="false"
timeToIdleSeconds="5"
timeToLiveSeconds="10"/>
<!-- 例子2: 最大闲置5秒,最大存活0。结论:当存活时间不设置(0默认),只要闲置时间内访问,可以无限存活。-->
<cache name="e2_cache"
maxElementsInMemory="1000"
eternal="false"
overflowToDisk="false"
timeToIdleSeconds="5"
timeToLiveSeconds="0"/>
<!--
maxElementsInMemory设置成1,overflowToDisk设置成true,只要有一个缓存元素,就直接存到硬盘上去
eternal设置成true,代表对象永久有效
maxElementsOnDisk设置成0 表示硬盘中最大缓存对象数无限大
diskPersistent设置成true表示缓存虚拟机重启期数据
-->
<cache
name="e3_cache"
maxElementsInMemory="1"
eternal="true"
overflowToDisk="true"
maxElementsOnDisk="0"
diskPersistent="true"/>
</ehcache>
本文使用的是其中的名为ehcache_test的具体cache做测试
缓存代码
/**
 * @program: fc-redis->EhCacheTestService
 * @description: ehcache
 * @author: G_Y
 * @create: 2019-09-10 15:07
 **/
@Service
@CacheConfig(cacheManager = "ehCacheCacheManager", cacheNames = {"ehcache_test"}) //ehcache.xml 配置文件中定义
@Slf4j
public class EhCacheTestService {

    @Autowired
    private TbUserMapper userMapper;
    @Autowired
    private EhCacheCacheManager ehCacheCacheManager;

    @Cacheable(key = "#id")
    public TbUser getUser(Integer id) {
        log.info("This is use ConcurrentCache cache user");
        TbUser tbUser = userMapper.selectByPrimaryKey(id);
        return tbUser;
    }

    @CachePut(key = "#user.id")
    public TbUser addOrUpdateUserById(TbUser user) {
        user.setUpdateTime(new Date());
        if (user.getId() == null || user.getId() == 0) {
            userMapper.insertSelective(user);
            return user;
        }
        userMapper.updateByPrimaryKeySelective(user);
        return user;
    }

    // allEntries:
    //是否清空所有缓存内容,缺省为 false,如果指定为 true,则方法调用后将立即清空所有缓存
    //beforeInvocation:
    //是否在方法执行前就清空,缺省为 false,如果指定为 true,则在方法还没有执行的时候就清空缓存,缺省情况下,如果方法执行抛出异常,则不会清空缓存
    @CacheEvict(key = "#id")
    public boolean deleteUserById(Integer id) {
        int i = userMapper.deleteByPrimaryKey(id);
        if (i > 0)
            return true;
        return false;
    }
}
调用缓存及接口
/**
 * @program: fc-redis->CacheTestController
 * @description: 本地缓存测试
 * @author: G_Y
 * @create: 2019-09-10 15:04
 **/
@RestController
public class CacheTestController {
    @Autowired
    private EhCacheTestService ehCacheTestService;
    /**
     * 测试ehcache
     * @param id
     * @return
     */
    @GetMapping("/test/ehcache/get/{id}")
    public TbUser getUserById(@PathVariable("id") Integer id) {
        TbUser user = ehCacheTestService.getUser(id);
        System.out.println(user);
        return user;
    }
    @PostMapping("/test/ehcache/save")
    public TbUser saveUseByEhCache() {
        TbUser tbUser = new TbUser();
        tbUser.setName("saveUseByEhCache");
        tbUser.setPhone("1999");
        tbUser.setUpdateTime(new Date());
        tbUser.setCreateTime(new Date());
        tbUser.setUserName("userName_EhCache");
        TbUser user = ehCacheTestService.addOrUpdateUserById(tbUser);
        System.out.println(user);
        return user;
    }
}
缓存测试
image.png
第一次需要访问数据库

image.png
第二次再访问——直接用缓存数据,不在执行具体缓存方法逻辑(访问数据库查询)

image.png
关闭当前服务——数据持久化到磁盘

image.png

image.png
重启服务——重新加载持久化缓存到内存

image.png
再次访问——依旧使用缓存数据,不用访问数据库

image.png
访问新的数据——注意id

image.png
访问数据库——缓存新的数据

image.png
缓存key超时设置
具体见每一个cache的配置项,如:
image.png
至此,完成SpringBoot——EhCache的整合使用教程
SpringBoot整合Redis缓存
优势:
1、实现缓存统一管理,实现各服务访问缓存的数据一致性;
2、分布式缓存,符合微服务设计原理;
3、易拓展、维护、高可用、负载能力强;
pom依赖
        <dependency>
            <groupId>org.springframework.boot</groupId>
            <artifactId>spring-boot-starter-data-redis</artifactId>
        </dependency>
Redis配置
spring:
  redis:
    port: 6379
    database: 0
    host: 127.0.0.1
    password:
    jedis:
      pool:
        max-active: 8
        max-wait: -1ms
        max-idle: 8
        min-idle: 0
    timeout: 5000ms
# redis cache中配置的名称
mycache:
  cacheManagerName: redisCacheManager
  userCacheName: user
  productCacheName: product
Java类配置Redis对应Cache跟CacheManager
@Configuration
@EnableCaching
public class CacheConfig {
    @Value("${mycache.userCacheName}")
    private String USER_CACHE;
    @Value("${mycache.productCacheName}")
    private String PRODUCT_CACHE;
    // 更改对象存储的序列化方式(默认是JDK序列话),这里采用json字符串存储对象
    @Bean(value = "redisTemplate")
    @ConditionalOnMissingBean(name = "redisTemplate")
    public RedisTemplate<String, Object> redisTemplate(
            RedisConnectionFactory redisConnectionFactory) throws UnknownHostException {
        Jackson2JsonRedisSerializer<Object> jackson2JsonRedisSerializer = new Jackson2JsonRedisSerializer<Object>(
                Object.class);
        ObjectMapper om = new ObjectMapper();
        om.setVisibility(PropertyAccessor.ALL, JsonAutoDetect.Visibility.ANY);
        om.enableDefaultTyping(ObjectMapper.DefaultTyping.NON_FINAL);
        jackson2JsonRedisSerializer.setObjectMapper(om);
        RedisTemplate<String, Object> template = new RedisTemplate<String, Object>();
        template.setConnectionFactory(redisConnectionFactory);
        template.setKeySerializer(jackson2JsonRedisSerializer);
        template.setValueSerializer(jackson2JsonRedisSerializer);
        template.setHashKeySerializer(jackson2JsonRedisSerializer);
        template.setHashValueSerializer(jackson2JsonRedisSerializer);
        template.afterPropertiesSet();
        return template;
    }
    @Bean(value = "redisCacheManager")
    @Primary
    public RedisCacheManager redisCacheManager(
            @Qualifier("redisTemplate") RedisTemplate<String, Object> redisTemplate) {
        RedisCacheWriter redisCacheWriter = RedisCacheWriter
                .nonLockingRedisCacheWriter(redisTemplate.getConnectionFactory());
        RedisCacheConfiguration redisCacheConfiguration = RedisCacheConfiguration
                .defaultCacheConfig()
                .serializeValuesWith(RedisSerializationContext.SerializationPair
                        .fromSerializer(redisTemplate.getValueSerializer()));
         注意定义的cacheManager中可以根据cacheName 设置缓存属性
        return new RedisCacheManager(redisCacheWriter, redisCacheConfiguration,
                this.getRedisCacheConfigurationMap());
    }
    // RedisCacheManager管理(创建、初始化)具体Cache 设置具体的cache缓存超时失效时间
    private Map<String, RedisCacheConfiguration> getRedisCacheConfigurationMap() {
        Map<String, RedisCacheConfiguration> redisCacheConfigurationMap = new HashMap<>();
        redisCacheConfigurationMap.put(USER_CACHE,
                this.getRedisCacheConfigurationWithTtl(40L, ChronoUnit.SECONDS));
        redisCacheConfigurationMap.put(PRODUCT_CACHE,
                this.getRedisCacheConfigurationWithTtl(3L, ChronoUnit.DAYS));
        return redisCacheConfigurationMap;
    }
    // RedisCacheManager管理(创建、初始化)具体Cache
    private RedisCacheConfiguration getRedisCacheConfigurationWithTtl(Long time,
                                                                      TemporalUnit timeUnit) {
        Jackson2JsonRedisSerializer<Object> jackson2JsonRedisSerializer = new Jackson2JsonRedisSerializer<>(
                Object.class);
        ObjectMapper om = new ObjectMapper();
        om.setVisibility(PropertyAccessor.ALL, JsonAutoDetect.Visibility.ANY);
        om.enableDefaultTyping(ObjectMapper.DefaultTyping.NON_FINAL);
        jackson2JsonRedisSerializer.setObjectMapper(om);
        RedisCacheConfiguration redisCacheConfiguration = RedisCacheConfiguration
                .defaultCacheConfig();
        redisCacheConfiguration = redisCacheConfiguration
                .serializeValuesWith(RedisSerializationContext.SerializationPair
                        .fromSerializer(jackson2JsonRedisSerializer))
                .entryTtl(Duration.of(time, timeUnit));
        return redisCacheConfiguration;
    }
}
缓存操作代码
@Service
@Slf4j
// 注意定义的cacheManager中可以根据cacheName 设置缓存属性 ,具体见RedisConfig
// 这里将数据缓存进入了两个cache,分别是 user、product;可以分别设置缓存属性值
@CacheConfig(cacheManager = "redisCacheManager", cacheNames = {"user", "product"}) // 实现队列  或者二级缓存
public class UserService {
    //condition = "可加缓存条件" // 比如判断冷热数据  近一个月数据缓存 用户经常查询
    @Cacheable(key = "#id")
    public TbUser getUserById(Integer id) {
        log.info("Redis not use, Query Mysql!!");
//        System.out.println("Redis not use, Query Mysql!!");
        return userMapper.selectByPrimaryKey(id);
    }
    // 更新缓存
    @CachePut(key = "#user.id")
    public TbUser updateUserById(TbUser user) {
        user.setUpdateTime(new Date());
        userMapper.updateByPrimaryKeySelective(user);
        return user;
    }
    // allEntries:
    //是否清空所有缓存内容,缺省为 false,如果指定为 true,则方法调用后将立即清空所有缓存
    //beforeInvocation:
    //是否在方法执行前就清空,缺省为 false,如果指定为 true,则在方法还没有执行的时候就清空缓存,缺省情况下,如果方法执行抛出异常,则不会清空缓存
    @CacheEvict(key = "#id")
    public boolean deleteUserById(Integer id) {
        int i = userMapper.deleteByPrimaryKey(id);
        if (i > 0)
            return true;
        return false;
    }
}
测试代码
@SpringBootTest
@RunWith(SpringRunner.class)
public class RedisTest {
    @Autowired
    UserService userService;
    @Test
    public void testRedisCache() {
        TbUser userById = userService.getUserById(5);
        System.out.println(userById);
    }
    @Test
    public void testRedisPut() {
        TbUser user = new TbUser();
        user.setId(5);
        user.setPhone("177");
        user.setName("bbbbbb");
        user.setPhone("177");
        user = userService.updateUserById(user);
        System.out.println(user);
    }
    @Test
    public void testDeleteCache() {
        boolean b = userService.deleteUserById(3);
        System.out.println(b);
    }
测试testRedisCache结果——访问数据库

image.png
user_cache 40秒过期——再查redis 无user_cache数据
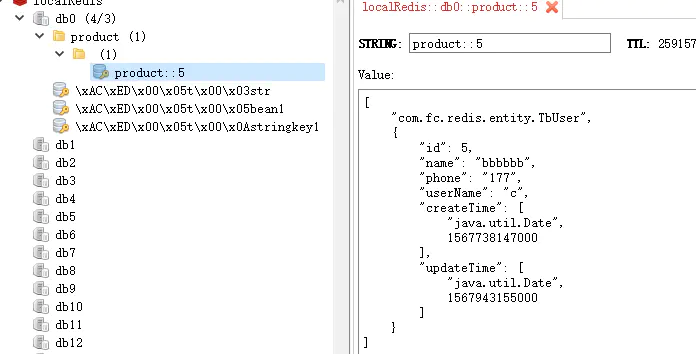
image.png
再次测试——实现走缓存,不再访问数据库,只要有一个cache中存在缓存的数据,即可

image.png